
The Journal · Field Notes
A patio is mostly buried. The part you see is a thin layer of stone or concrete sitting on top of work nobody will ever look at again. That hidden work is what decides whether the patio lasts thirty years or starts heaving and cracking after two. After ten years of building in the Kansas City Metro, we can tell you with confidence that the number one reason a hardscape fails is not the stone, not the design, not the weather. It is base preparation that was rushed or skipped. Here is exactly what should happen in those first 12 inches of ground before any stone goes down, why each step matters, and what the shortcuts look like so you can spot them in someone else's quote.
Most of the metro sits on heavy clay. Clay holds water in spring, dries out in summer, and swells and shrinks as the moisture changes. Combine that with our winters, which freeze the top 18 to 30 inches of ground and then thaw it again sometimes multiple times in a single week, and you have soil that moves. A patio built on top of unprepared clay is sitting on a surface that physically rises and falls with the seasons.
The job of a properly built base is to absorb that movement so the patio above does not. This is why Kansas City needs deeper, more carefully built bases than a contractor working in stable sandy soil would ever bother with. The work below grade is half the project, and on a properly built patio it is most of the labor.
Before anything goes in, the existing ground has to come out. For a paver patio we excavate 8 to 10 inches below the finished surface elevation, plus the thickness of the pavers themselves. For a driveway it is 10 to 12 inches. For a concrete patio it is 6 to 8 inches. The dig has to be carried 6 inches past the edge of where the patio will sit, because the base needs to extend beyond the patio to prevent the edges from rolling.
The grade matters as much as the depth. Every patio we build is sloped 1/8 to 1/4 inch per foot away from the house. This is non-negotiable. Without slope, water sits on the patio and works its way into the joints, then into the base, then under the structure. Slope away from the house also keeps that water moving toward the lawn instead of toward the foundation, which is the most expensive thing in your backyard.
A common shortcut is to grade the surface of the patio without grading the base under it. The result is a patio that looks sloped right but holds water in pockets underneath. Done right, the slope is built into every layer from the excavated subgrade all the way up.
This is the single most-skipped step on cheap hardscape installs and the one that determines whether your patio lasts ten years or thirty. After the subgrade is shaped and rolled, we lay a geotextile separation fabric across the entire excavation. The fabric separates the clay subgrade from the gravel base above. Without it, over time the gravel migrates down into the clay and the clay migrates up into the gravel, and the engineered base you paid for slowly becomes mud.
Geotextile fabric adds about $0.50 to $1.50 per square foot to the project cost. On a 600 square foot patio, that is $300 to $900. If a quote you are reviewing does not mention it, ask. If the answer is "we don't usually do that," that is a fair signal of what corners are getting cut elsewhere.
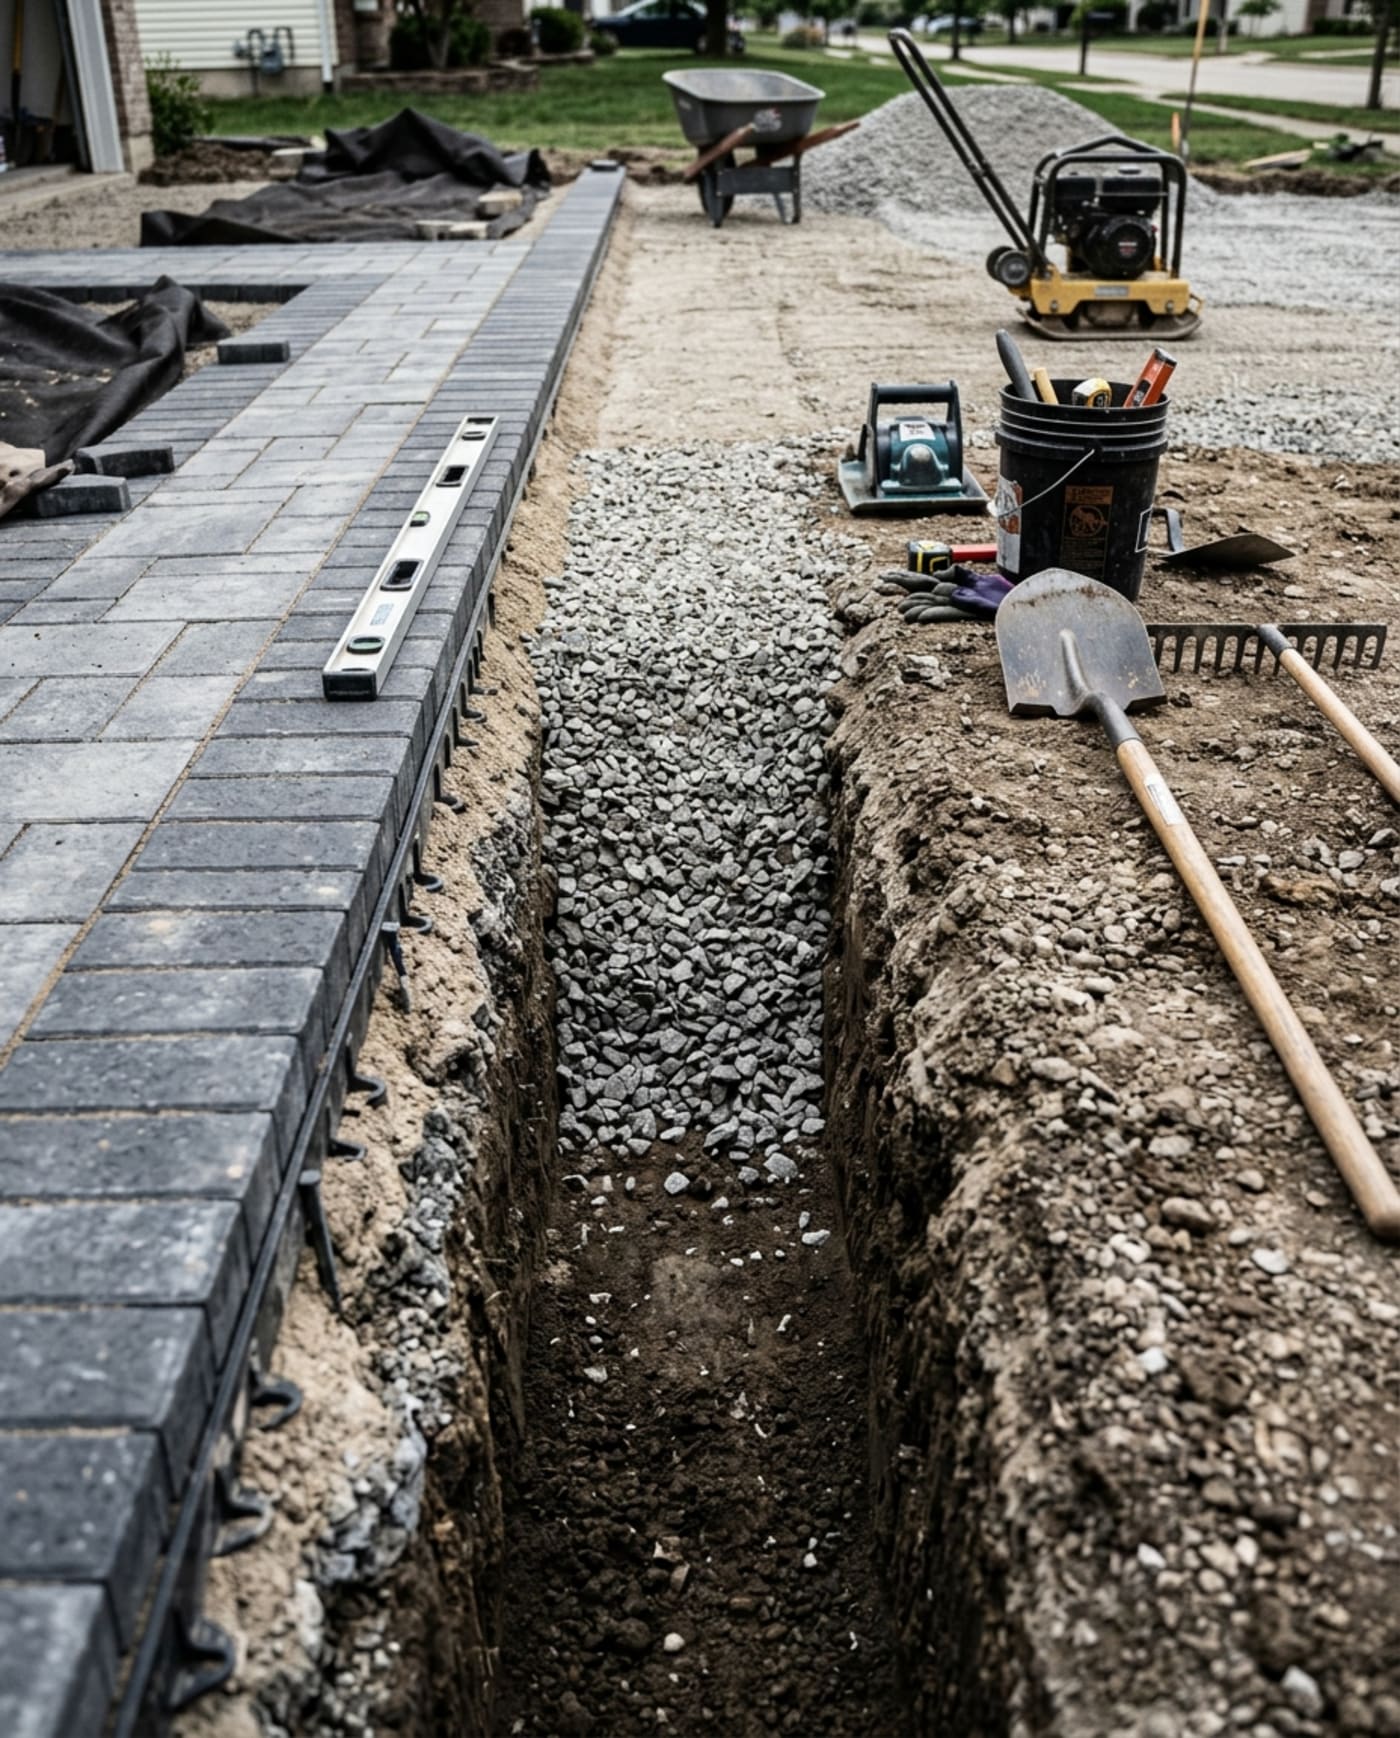
The base is what does the structural work. For pavers we use a graded crushed aggregate, typically a quarry-run material commonly called Class 2 base or similar. The fines and the larger stones lock together when compacted, creating a rigid, free-draining layer that supports the patio above and drains water away from it.
The thickness depends on use. For a residential patio with foot traffic only, 6 to 8 inches of compacted base is the standard. For a driveway that will see vehicle loads, 10 to 12 inches. For a patio with a hot tub, an outdoor kitchen with a large grill, or any structure with concentrated weight, we go thicker under those spots specifically.
The word that matters in "compacted base" is compacted. The base is laid in 2 to 3 inch lifts and each lift is run with a vibratory plate compactor before the next one goes down. You cannot dump 8 inches of gravel at once and run a compactor over the top. The bottom layers will not compact. Done right, a properly compacted base will not let a fingernail mark its surface. Done wrong, you can press your thumb into it.
Above the compacted base sits the setting bed, which is a 1 inch layer of coarse, sharp sand or fine stone chips. This is the layer the pavers actually sit on. It is screeded perfectly level to the slope (not to flat, to the slope), and the pavers are laid into it.
The setting bed has to be sharp, angular material, not playground sand and not mason sand. Round or fine sand acts like ball bearings under the patio and the stones can shift. Sharp sand locks the pavers in place and lets water drain through.
The 1 inch thickness matters too. Thicker setting beds give the pavers room to settle unevenly. Thinner ones do not give the installer room to adjust for the small surface variations in the base. One inch is the spec, and it is checked with a screed bar at every section.
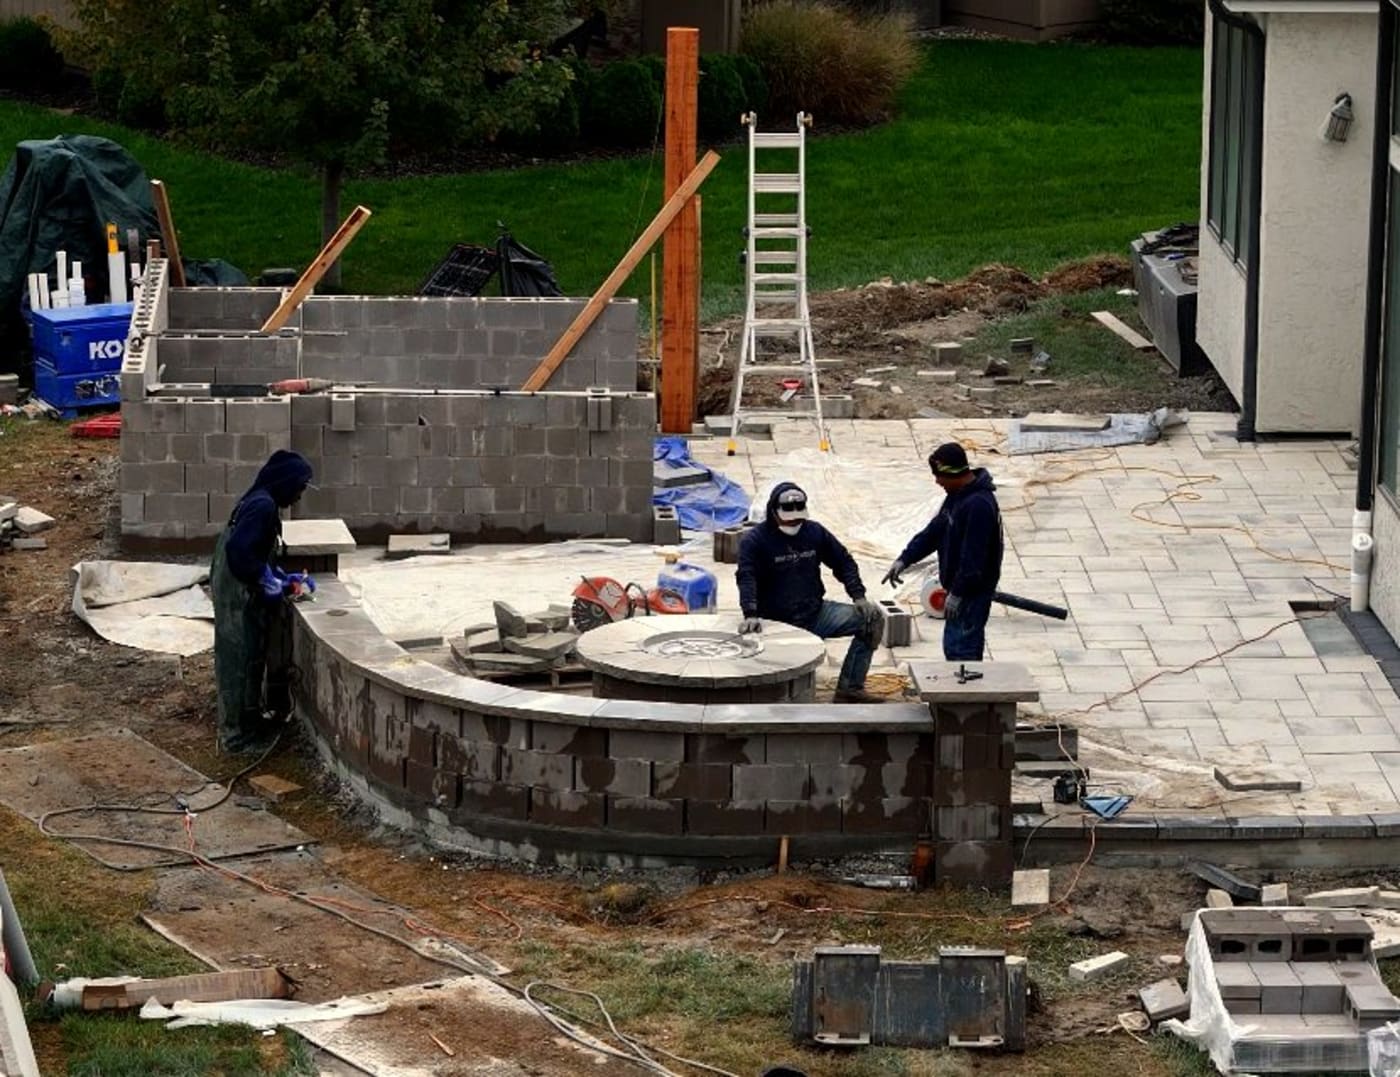
The pavers around the perimeter of the patio are held in place by an edge restraint, which is a heavy plastic or metal extrusion spiked into the compacted base with 10 inch landscape spikes. Without an edge restraint, the perimeter pavers slowly creep outward over the years from foot traffic, freeze-thaw, and lawn mower vibration. The middle of the patio looks fine. The edges open up and the joints start to spread.
Some contractors substitute a concrete edge bond, troweled along the outside of the perimeter pavers, instead of a proper edge restraint. This is the cheap version and it cracks within a season or two in our freeze-thaw climate. The right method is a proper extruded restraint, properly spiked, every 6 to 8 inches.
Once the pavers are set, the joints between them are filled with polymeric sand, which is a fine sand combined with a polymer binder. Once wetted in, the polymer activates and locks the sand into a flexible, water-resistant joint that keeps weeds out, ants out, and rain from washing the joint material away.
The cheap alternative is plain joint sand, which is unbound and erodes within a year or two. You will see weeds in the joints by year two and missing sand by year three. Polymeric sand costs more, but it is the difference between a patio you sweep twice a year and a patio you re-sand every spring.
Application matters. The sand must be swept into the joints, vibrated in with a plate compactor and a protection pad, then blown clean off the paver surface before activation. Water is then misted on (not flooded) to set the polymer. Skipping the cleanup step before water causes the polymer to bond to the paver surface and leave a haze that is hard to remove.
Concrete projects, including stamped concrete, do not need a sand setting bed or polymeric sand because the concrete itself is the structural surface. But the work underneath is similar.
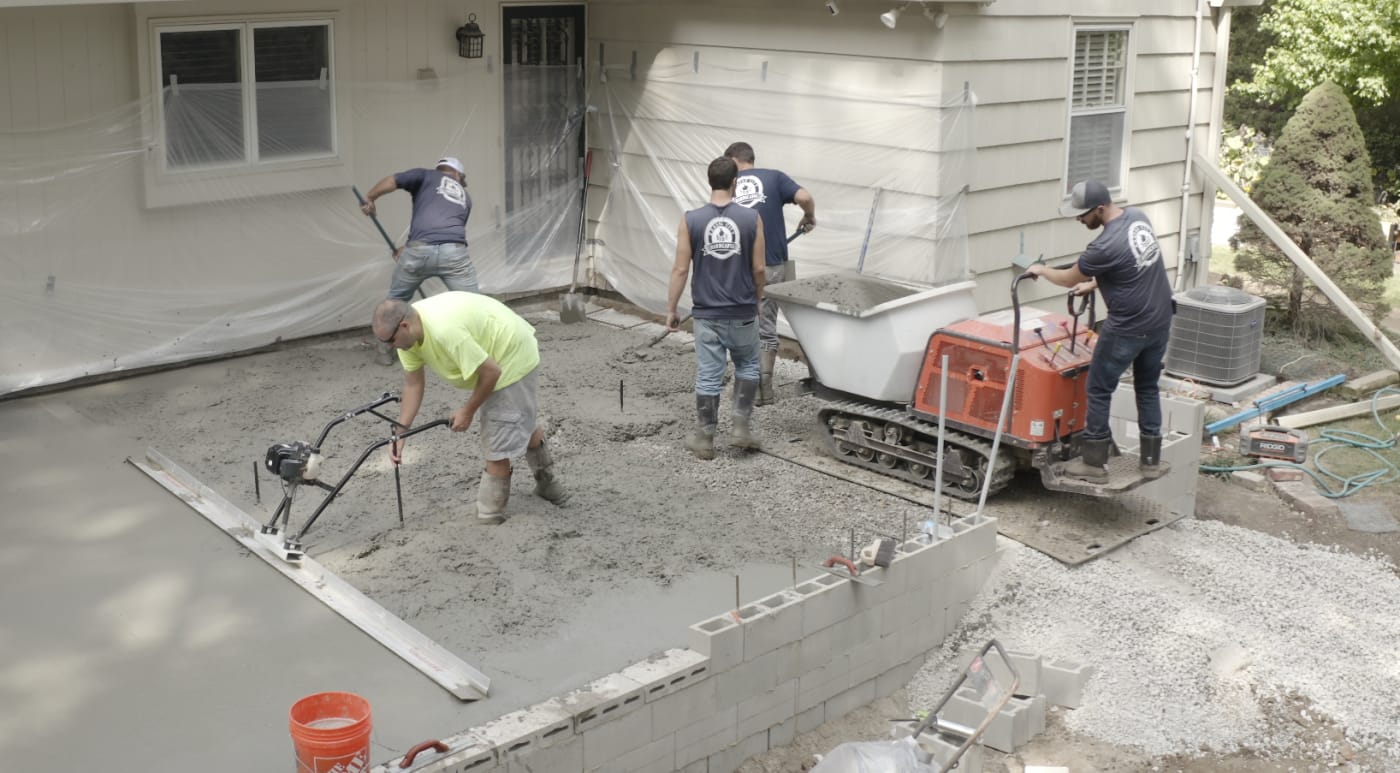
We still excavate. We still grade with slope. We still lay geotextile in many cases. The base under concrete is typically 4 to 6 inches of compacted aggregate, with rebar or wire mesh placed on chairs before the concrete is poured to keep it suspended in the middle of the slab. The forms hold the perimeter, the concrete is poured to proper depth (4 inches for patios, 5 to 6 for driveways), and then finished, stamped if applicable, and sealed.
The risk on concrete is cracking. Concrete shrinks slightly as it cures, and shrinks and expands with temperature changes over its life. Control joints, tooled or saw-cut into the slab in a planned grid, give the concrete a place to crack on purpose so it does not crack randomly across the face of the slab. Skip the control joints and the patio cracks where it wants, which is rarely where you want.
We build year-round in Kansas City, but cold weather changes how the work has to be done.
For paver work, frozen ground cannot be excavated or compacted properly. We thaw the work area with propane heaters and ground-thawing blankets before excavation in deep winter. Compaction still works at low temperatures as long as the aggregate is dry.
For concrete, the air temperature matters. Concrete needs to stay above 40 degrees while it cures for the first three to seven days. We use insulated curing blankets, build temporary enclosures with plastic sheeting, and run propane heaters inside those enclosures when needed. We will not pour concrete onto frozen ground, and we will not pour if a hard freeze is in the forecast for the curing window.
The cold-weather work is more expensive than warm-weather work because of the extra labor and equipment, but it is real construction, not winter shortcuts. The patios we pour in February are as durable as the ones we pour in July.
If you are reviewing a quote from another contractor, here are the prep-stage shortcuts that signal a problem.
No mention of base depth or compaction. If the proposal does not specify how thick the base will be or in what lifts it will be compacted, you do not know what you are buying.
No geotextile fabric. Some installers skip this to save money. Over our climate it shortens the patio's lifespan dramatically.
Setting bed listed as "sand" with no spec. Sharp sand and round sand look identical to most homeowners but they perform differently.
"Concrete bond" or "concrete curb" as the edge restraint. This is the cheap version. In our climate it cracks within one or two freeze-thaw cycles.
No control joints called out on a concrete plan. The patio is going to crack. The only question is whether on planned lines or random ones.
Crew skipping plate compaction between lifts. If the operator dumps a 6 inch lift and rolls it once at the surface, the lower 4 inches never compacted. The patio will sag within a year.
How long does ground prep take on a typical patio? For a 400 to 600 square foot residential patio, prep through compacted base is usually 2 to 4 days of the project. Stone install and finishing is another 3 to 5 days.
Can I prepare the ground myself and have you install the pavers? We do not install on prep we did not do, because if the patio fails we are accountable for it. Owner-prepped subgrades are something only the homeowner can warranty.
What about tree roots? Large roots within the excavation area need to be cut back or, in some cases, the patio design needs to flex around them. Cutting roots from a mature tree can compromise the tree, so we evaluate each case before deciding.
How do you handle utility lines? We call 811 (Missouri or Kansas One Call) before every dig. Utility locates take 2 to 3 business days and are required by law.
Will the patio settle over time? A properly prepared patio will settle a fraction of an inch in the first year as the base fully consolidates, then hold. A poorly prepared one will keep settling and develop dips and uneven seams.
Can you fix a failed patio someone else built? Sometimes. If the base failed completely, the only real fix is a rebuild. If only the surface is the issue, occasional resets are possible. We evaluate each one.
The work nobody sees is the work that decides whether your patio lasts ten years or thirty. At Kansas City Hardscapes we treat ground prep as half the project, not a step to rush past on the way to the visible stone. If you are planning a patio, driveway, or any hardscape in the Kansas City metro and want a contractor who will tell you exactly what is happening below grade and why, we are glad to walk the property with you. Call us at 816-499-2547 or book a free consultation through the Get Started page.
Thirty minutes on site with our designer is all it takes to see what is possible. No pressure, no hard sell.
Schedule a Design Call